
The Beginner’s Guide: Using Elementor in WordPress
A few decades ago, the process of building a website involved a lot of effort and interaction between several professionals, such as a website programmer, website designer, etc. It took months just to update a few simple changes to the website.
What is Elementor?
Today, you don’t need to know a coding language to build quality websites.
Page builders like Elementor make it especially easy for non-coders to create any WordPress website they want.
In this guide, you will learn about Elementor and how it can help you build a stunning website.
Elementor is a drag-and-drop page builder for WordPress.
This plugin helps you create beautiful pages using a visual editor. It is designed to help you build dynamic websites quickly.
The WordPress plugin is a versatile solution that allows you to control every part of your website design in one platform. You can customize your website to match your brand with motion effects, multiple fonts, and enhanced background images.
Why should you use Elementor?
If you’re not tech-savvy, the visual editor gives you the flexibility to drag and drop any of the 90+ widgets to create content, such as buttons, star ratings, and progress bars. For WordPress developers, it’s still a leading platform with script optimization, custom features, and rollback versions.
What can you build with Elementor?
Elementor is a powerful tool for building any website – from entire websites to specific landing pages. You can design sales pages, promotional pages, and even custom forms.
Just about anything you can imagine, Elementor can help you design.
Is Elementor free?
Elementor offers both a free plan and several paid subscription plans. The free version comes with all the features you need to create a powerful user experience on your site, including a drag-and-drop editor, 40+ basic widgets, and 30+ templates.
If you want to access more advanced functionality, such as the ability to add forms and custom CSS, you can upgrade to the PRO version.
How to install Elementor ?
Like other WordPress plugins, installing Elementor is quick and simple.
There are two ways to do this.
Installing Elementor via Elementor.com

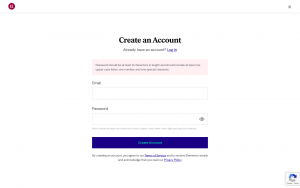
Step 1: Go to Elementor.com and click Get Started.
Step 2: Fill in your email address and password to create an account.
Step 3: Answer a few questions – what the website is for and how much experience you have in building websites.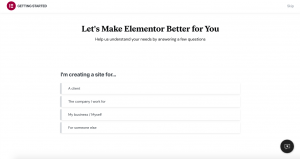
Step 4: Choose how you want to build your website. You can purchase the Elementor Pro plugin or a package that includes the plugin as well as WordPress installation and hosting. You can also check out other professional plans or start with the basic free version. 
For this demo, we chose the free plan.
Step 5: Since Elementor requires you to have an active WordPress website, enter your website domain into their checker to make sure your website is on the WordPress platform.
Step 6: After confirming the compatibility of your website, click Install Elementor.
Step 7: If you are redirected to your website administrator login page, go ahead and log in. If you are already logged in, you will be taken directly to the Elementor plugin page.
Click Install Now in the lower left corner.
Step 8: After that, you will reach a page with a confirmation message. Click Activate Plugin.
That’s it! Now you can start using the Elementor page editor.
Installing Elementor via the WordPress dashboard
Step 1: From your dashboard, click on Add-ons> Add new.
Step 2: In the search field, enter Elementor and locate Elementor Website Builder.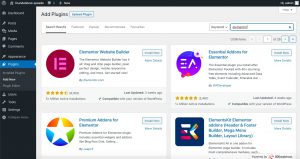
Step 3: Click Install Now. After installation, click Run.
The page builder will automatically be added to your sidebar. However, this sidebar item is only for accessing Elementor settings in the dashboard, not for editing your pages.
How to use Elementor in WordPress
With Elementor, you can take your design vision and turn it into reality.
Live editing makes the process simpler by allowing you to see each element as you design it. Let’s explore how to use the Elementor editor.
Elementor tutorial
Elementor offers intuitive design for users.
Therefore, you can learn the basics of the editor in a few minutes.
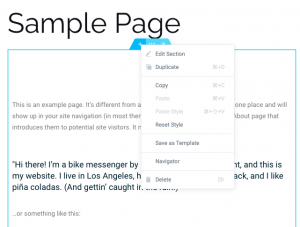
Step 1: To get started, create a new page or post and click Edit with Elementor.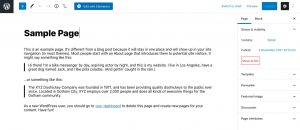
Step 2: Go to the Elementor page editor. This is what your page will look like: 
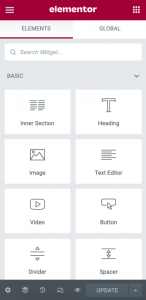
Step 3: On the left, you will see the Elementor sidebar with all the drag and drop features that you can use to build your web page.
Before you start dragging and dropping widgets, you should first understand that the Elementor editor is made up of three main building blocks: sections, columns, and widgets. Sections are the largest building blocks.
Inside the sections, you can add groups of columns, the widgets are inside the columns.
The editor will show you where you can drag a widget by highlighting the sections and columns in a blue box.
Note that you cannot drag a widget to the navigation bar or header.
You control the sections, columns, and widgets using the blue handle.
Simply right-click on the handle to edit the blocks.
Step 4: When you’re ready, simply click, hold, and drag a widget to where you want to add the new module. For example, when you scroll to the bottom of the page, you’ll have the option to drag a widget to a new, empty area.
Step 5: You can search for specific widgets to customize your pages. Choose from basic elements, like a header or image gallery, or explore more advanced elements, like animated headers and testimonial carousels.

Step 6: Click the three-bar button in the top-left corner, then click Site Settings. In this menu, you can set the default colors and fonts for your pages. You can also set global settings for your entire site in Elementor. 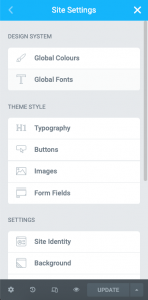
Step 7: Finally, you can click on the history icon at the bottom of the panel to access Elementor’s built-in revision history section. Under the Actions tab, you can track your changes, moving back and forth between each action. Under the Versions tab, you can switch between your versions and revert to any previous version.
How to build your first page in Elementor
Elementor stands out from its competitors thanks to its simple and convenient use.
You can try it out for yourself by building your first page on the platform – no coding skills required.
Step 1: Log in to your WordPress dashboard.

Step 2: Click Pages and then Add New.
Step 3: Click Edit with Elementor to enter the page builder.
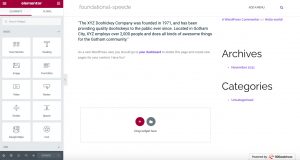
Step 4: Elementor will load and look like this:
Step 5: Next, add a title, text editor, and image.
Step 6: Once you drag it into place, you can edit each widget to your heart’s content.
Click the green publish button, and you’re done! You’ve built your first page in Elementor.
Step 7: Once you’re done designing your page, you can preview it and then publish it. To get started, go to the panel on the left side of the Elementor editor.
Step 8: To preview your page, click the eye icon.
Step 9: To publish, click the green publish button.
Elementor Templates
Templates are pre-designed pages and blocks to help you design your WordPress site. Pages are full content layouts, while blocks are sections with pre-built widgets, like footers, headers, and FAQs.
Elementor gives you a full license to use any of the templates for your business. There is a field to search for specific templates by page type, template name, or tag. Plus, all templates are mobile-friendly. You can insert them into any page with just one click.
Step 1: Inside the Elementor editor, navigate to the bottom of the page where there is a section that says Add widget here.
Click on the white folder.
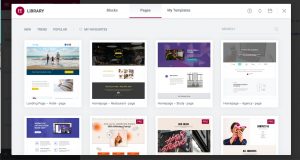
Step 2: The library will load. To preview a template, click the magnifying glass icon or the image. Or simply hover your mouse over one of them.
Step 3: Click the green Add button.
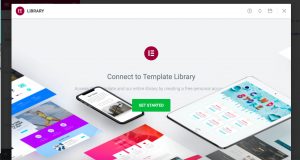
Step 4: If you are not already logged into the Elementor template library, you will be prompted to do so. Elementor will automatically redirect you to its website, where you can register or log in.
Step 5: After registering or logging in, your connection will be confirmed.
Step 6: Return to the page you edited and insert the desired template.
That’s it! Your template is loaded and ready to customize.
How to use advanced features in Elementor
Elementor’s pro version offers advanced features to take your WordPress site to the next level. There’s access to additional widgets, theme builders, pop-up builders, and custom field capabilities.
How to create a popup in Elementor
Forms and pop-ups help you capture email addresses from leads.
Elementor makes it easy to create such forms and windows,
Follow these instructions to create your own pop-up window.
Step 1: In your WordPress dashboard, go to Templates > Popups > Add New.
Step 2: Name your template and click Create Template.
Step 3: Choose a template from the library or create your own design.
Step 4: Click ‘Publish’ and then Save and Close.
Step 5: Open a new page in Elementor (CTRL + E for PC users; Command + E for Mac users).
Step 6: Drag in a Button widget.
Step 7: Under Layout, select Link> dynamic> Actions> Popup .
Step 8: Go to Popup> Open Popup and select the popup you created.
Step 9: Go to the live page.
Step 10: Then, click the button and see the pop-up window appear.
How to customize WooCommerce product page in Elementor?
WooCommerce is a popular e-commerce platform that can help you build an online store for your business. Together with Elementor, you create custom product pages to boost your sales.
Before you can customize your product page, you will need to install and activate WooCommerce.
and Elementor for your WordPress dashboard.
You can learn about setting up WooCommerce here.
Once set up, you can design your product page. Follow these steps:
Step 1: In your WordPress dashboard, go to Elementor > My templates.
Step 2: Click the Add New button.
Step 3: Select Single Product as your template type and click Create Template.
Step 4: The Elementor library will load.
Step 5: Next, choose a pre-designed product page template, or build one from scratch.
Step 6: In the template, add different product widgets to personalize your page.
Step 7: When you are ready to preview your page,
Click the eye icon in the lower left pane.
Step 8: Click Settings and then select the product you want to display.
Step 9: To publish your page, click the green publish button in the bottom left panel.
Elementor FAQs
Still have questions about Elementor? No problem.
Here are some frequently asked questions about the plugin along with the answers to them.
- Does Elementor work with all themes?
Yes, it works with all themes that comply with WordPress coding standards.
- Does Elementor slow down the website?
Elementor is one of the fastest page builders. However, some websites can experience slow loading times, but Elementor has provided a guide on how to fix the site speed issue.
- Is Elementor good or bad for SEO?
Elementor can be detrimental to SEO if it slows down your site, but by following best practices, such as compressing images and limiting excessive scripts, you can have a fast website even with Elementor installed.
Elementor, like any great WordPress page builder, is good for SEO. By helping you create a beautiful, responsive website, Elementor allows you to keep users on your page.
As visitors engage with your content, search engine algorithms will understand that your site is valuable, improving your rankings and SEO.
Build your WordPress website with Elementor
In summary, Elementor is a WordPress plugin built specifically to help you design a custom website for your business.
Its user-friendly interface makes it an effective platform even for non-programmers.
If you want to attract and nurture more leads, install Elementor and the HubSpot WordPress plugin to increase your conversions.
At Host Center, you will receive Elementor Pro free for one year as part of a WordPress hosting package.
For more details, contact us.
Read more about Elementor with Woocommerce integration
The article was translated from English by Yahav Bengiat.
Article written by: Sheila Price